Friday, November 30, 2012

How to "Preview" before you open a file

 Windows 7 & 8 allow you to "preview" a file BEFORE you open it from any folder.
Windows 7 Example


  1. Open a folder that contains files you wish to preview.
  2. Turn on the Preview Pane by selecting the icon as shown in the screenshot displayed above (for Windows 7). 
    Note: In Windows 8 or RT, the Preview option is available on the View tab of the Ribbon.
  3. Click on a file name and the preview appears:
   4.  Continue clicking on each file name until you locate the desired file.
   5.  IMPORTANT: Turn off the Preview Pane, by deselecting the Preview icon, after locating the desired file. 


If you don't have Windows 7 or 8, but have Microsoft Office, you can use the Preview option from a specific application.  For example, open MS Word, click the "Open" command, and then click the Preview Pane icon (2007) or click the View icon and select "Preview" (2003)Currently, this option does not work from Office 2010.


Monday, October 29, 2012

Trouble with aligning numbers in MS Word?


If you’ve used auto-numbers in MS Word you’ve noticed that numbers 1-9 look great when numbering lists, however the number “10” doesn’t align as you would expect.  The “1” aligns under the “9” instead of the “0” aligning under the “9”.  If this just doesn’t look right to you, change the alignment by doing the following In Word 2007 or 2010:

  1.  Click anywhere within the numbered data.
  2.  From the Home tab, Paragraph group, click the down-arrow next to the auto-numbering command.
  3. In the menu, select “Define new number format”.
  4. In the Alignment drop-down box, select “Right
  5. Click OK.

Now the numbers should display as shown below:

Saturday, September 29, 2012

Shortcut to Save a Website in your Browser

Saving a website as a "Favorite" in Internet Explorer or "Bookmark" in Google Chrome or Firefox is easy!

  1. While viewing a website from one of the 3 browsers listed above press Ctrl+D
    (press and hold the Ctrl key, while you tap the D key and then release both keys.)
  2. The dialog box will open with the website information.  In Internet Explorer, click the Add button and in Google Chrome or Firefox, click Done.
You have now saved the website for future access. To view your Favorites or Bookmarks, follow the steps for your specific browser:
  • Internet Explorer - Click the Favorites icon (gold star) or Favorites menu or button.  Click on the website name in the Favorites list.
  • Google Chrome - Click the icon to Customize and control Google Chrome (3-bar icon on the far right at the top of the browser.)  Select Bookmarks > Show Bookmarks Bar to display a bar containing your bookmarks at the top of the browser or just select the website in the menu under Bookmarks.
  • Firefox - Click the Star icon in the top right corner of the browser and then select the website from the bookmarks list.  You can also click the Firefox box in the top left corner and then click Bookmarks.

Saturday, September 1, 2012

Pin a Folder to Windows Explorer (Windows 7)

This tip is for Windows 7 only:
Do you have a folder that you access frequently?  Why not "pin" it to Windows Explorer for quick access!
Windows Explorer is the directory for all files and folders available to you on your computer.

This is the Windows Explorer icon which appears on the Taskbar in Windows 7:


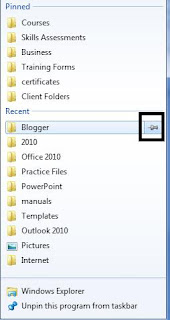
Right-click the Windows Explorer icon.  If the folder that you use frequently, is listed, hover the mouse over the folder name and click the push-pin icon to pin the folder to the list. The folder name will move from the Recent section to the Pinned section at the top. This will keep the "pinned" folder available at all times.  If there is a folder in the list that you don't want to see, right-click the folder and select "Remove from this list". 

If the folder you want to pin is not displayed in the list, follow the steps below to "pin" the folder to Windows Explorer.

  1. Open the current location of the folder you'd like to pin to the Windows Explorer icon.
  2. Click and drag the folder name to the Windows Explorer icon on the taskbar.
  3. Release the mouse.  You should now see the folder in the Pinned section when you right-click on the Windows Explorer icon.

Wednesday, August 1, 2012

Rename Multiple Files at the Same Time


If you’ve downloaded pictures to your computer or you have other files that you want to rename, you can quickly rename the files so that each file has the same name with a consecutive number following the name.  For example you could rename all your vacation pictures as “Disney World 2012 (1)”, “Disney World 2012 (2)”, etc.

  1. Locate all the files that you want to rename. (Do not open them.)
  2. Select all the files to rename. 
    - If the files are in consecutive order, click the first file, hold the SHIFT key down while clicking your mouse on the last file.  
    - If the files are not consecutive, click the first file and then press and hold the CTRL key while you select each of the remaining files.
  3. While the files are selected, right-click your mouse on the first file.
  4. Click RENAME.
  5. Type a name for the files, for example: Disney World 2012.
  6. Press the ENTER key.
  7. You're finished!  Each file should have the same initial name with a sequential number in parentheses.

Thursday, June 28, 2012

3 Other Methods for getting Excel Data to fit in 1 cell

If your data does not fit in the cell, try these other methods if expanding the column is not a good option:
  1. Wrap Text -  this option increases the row height and wraps the data within the current column width.  This command is found on the Home tab in Excel 2007 or 2010.  Select the cell you want to wrap and then press the "Wrap Text" command.
  2. Shrink to Fit - this option shrinks the cell contents to fit within the cell boundaries.  This command is found by clicking the dialog expander (arrow) in the bottom right corner of the Alignment grouping on the Home tab in Excel 2007 or 2010.  When you click the dialog expander, the Format Cells dialog box displays.  On the Alignment tab, click "Shrink to Fit" and then click OK.
  3. Merge - this option merges selected cells into one large cell.  This command is found on the Home tab in Excel 2007 or 2010.  Select the cells that you want to merge into one cell and then click Merge & Center in the Alignment group (to merge and center) or click the down arrow on the right of the Merge & Center command and select Merge.

Thursday, May 31, 2012

Create a Playlist in Windows Media Player (Windows 7)

If you've ripped your CD music onto your computer or downloaded music to your computer, you can customize a Playlist in Windows Media Player to group your music by your own personal selection.  Here's how:
  1. Open Windows Media Player - click the Start button and type: "Media Player" in the Search box.  When you see Windows Media Player in the search list, click on it.
  2. From Library view (in Windows Media Player), click Music in the navigation pane on the left.
  3. Locate the music files that you want to use in your playlist and drag them to the playlist section on the right.
  4. When you have all the music files that you want in your playlist, click "Save List" at the top of the playlist.
  5. Type a name for the playlist and press the ENTER key on your keyboard.
  6. To play your new playlist, double-click on the playlist name in the navigation pane on the left under Playlists.
Note:  Windows Media Player has two different views, "Library" and "Now Playing".  To switch from one view to the other, click the icon (as shown below) while in Windows Media Player.  The icon will display on the bottom right while in "Library" view and top right when in "Now Playing" view.
Icon to switch views in WMP


  • See my Blog Archive list (on the right) for January 2012 to learn how to Automatically rip (copy) a music CD to your Windows 7 computer.

Tuesday, May 1, 2012

Paste Column Width along with Excel Data

When you paste data into an Excel worksheet, do you find yourself resizing each column width to match the original width?

Excel 2010 allows you to quickly paste the column width along with your data.  This formatting can also be accomplished in earlier versions of Excel; however, it requires some additional steps.

Excel 2010
  1. Select the Excel data to be copied.
  2. Press Ctrl+c (to copy the data)
  3. Right-click in the cell where you want to paste the data.
  4. Select "Paste Special" and then click "Keep source column widths" in the context menu.
Excel 2007 or 2010

  1. Select the Excel data to be copied.
  2. Press Ctrl+c (to copy the data)
  3. Click in the cell where you want to paste the data.
  4. Press Ctrl+v (to paste the data).
  5. Click the Paste Options icon and click "Keep Source Column Widths".
Note: The Paste Options icon appears near the bottom right corner of the pasted data.

Excel 2003
  1. Select the Excel data to be copied.
  2. Press Ctrl+c (to copy the data)
  3. Right-click in the cell where you want to paste the data.
  4. Click "Paste Special".
  5. Select "Column Widths" and then click "OK".
  6. Press Ctrl+v (to paste the data).

Sunday, April 1, 2012

Useful Function Keys in Internet Explorer and Firefox

The "Function Keys" are located at the top of your keyboard (F1, F2, etc).  If you accidentally tap a function key, you might be surprised at what happens when you are on the internet using Internet Explorer or Firefox.  Some of these keys "toggle", meaning you click it once to apply the option and click it again to turn it off.  If the key doesn't toggle, just click your mouse in a different section of the window or click the "X" to close it.
Listed below are the keys and their function and which browser uses it:
  • F1 - Help (IE)
  • F3 - Find - type in the Find box to find a word on the current webpage. (IE)
  • F4 - Selects Address Bar and shows history (IE)
  • F5 - Refreshes webpage (IE and Firefox)
  • F6 - Selects Address Bar only (IE)
  • F7 - Turns Caret Browsing on and off.  This feature puts a moveable cursor in the webpage so that you can select text using the keyboard (shift + arrow keys) instead of selecting with the mouse. (IE)
  • F10 - Selects or displays the menu bar if it is not showing. (IE and Firefox)
  • F11 - Makes the view Full Screen and hides the address bar.  Press F11 again to turn it off.  (IE and Firefox)

Wednesday, February 29, 2012

Quickly Reduce the File Size of a Picture or Word Document Containing Pictures

The JPEG (Joint Photographic Experts Group) is a file format that compresses pictures.  If you save a picture that has a different file extension (such as .BMP, .GIF, or .TIFF) as a .JPG the picture will compress and the file size will be smaller.

Here's how to compress a single picture that is not a JPEG:
  1. Open the picture in any picture program such as Google's Picasa or Window's Paint.
  2. Click File > Save As
  3. Change the file save as type to .JPG
  4. Click Save.
To compress pictures in a Microsoft Word document:
  1. Open the Word document that contains pictures/graphics to compress.
  2. Double-click on any picture within the document.
  3. Follow instructions based on your version of MS Word:
    1. Word 2007-2010:  click "Compress Pictures" on the Picture Tools tab, deselect "Apply to selected picture only" (2007) or "Apply only to this picture" (2010), and then click OK.
    2. Word 2003: In the Format Picture dialog box on the Picture tab, click Compress. Select radio button Apply to: "All pictures in document"; click OK; click Apply; click OK to close the Format Pictures dialog box.
To create a "Compressed Folder" to attach to an email with files inside, see my Blog Archive from June 1, 2009.

Tuesday, January 31, 2012

How to make file extensions show in Microsoft Windows

1.       Right-click on the Start button and then click, “Open Windows Explorer”.

2.       From the Menu bar, click Tools and then click Folder Options.  (If the Menu bar is not displayed, press the ALT key to display the Menu bar.)

3.       Click the View tab in the Folder Options window .

4.       Deselect “Hide extensions for known file types”.

5.       Click OK.

Tuesday, January 3, 2012

Automatically Rip (copy) a Music CD to your Windows 7 Computer

Follow the steps below to Rip (copy) music from a CD to your Windows 7 computer:

Before beginning the steps below, make sure you are connected to the internet.  When your computer is connected to the Internet, the Player attempts to retrieve media information about the tracks being ripped from an online database.  The Player then adds the information to the files during ripping.
1.       Click the Start button.

2.       Type Windows Media Player in the search box.

3.       Click Windows Media Player to open the program.

4.       On the Menu bar, click Tools and then Options.  (Note: if you don’t see the menu bar, it might be hidden.  Click Organize > Layout > Show Menu bar to show the Menu bar.)

5.       In the Options window, click the Rip Music tab.

6.       Click the checkbox: “Rip CD automatically”

7.       Click the checkbox: “Eject CD after ripping”

8.       OPTIONAL: change the save location, file name, format, or audio quality on the Rip Music tab.

9.       Click OK.

10.   Insert a music CD to copy.

11.   If Autoplay opens or another program opens to play the CD, click the X to close it.  Windows Media player must remain open.

12.   You should see the names of each music track and the program will automatically begin ripping each track.  If you don’t want to copy every track, uncheck the box in front of the track.

13.   When the entire CD has finished copying, the CD will automatically eject if you selected that option above.
14.   To copy another music CD, just insert it and repeat steps 11 and 12 above.

15.   Now you can remove the CD and locate the music you just ripped by clicking Music in the navigation pane on the left.  Double-click to open a folder and then double-click a song title to play a song.
Notes:
If you do not see your music listed in Windows Media Player, click Start > My Music and locate the folder containing the music you ripped.  Double-click on the folder to open it and then double-click the song title to play.

Windows XP also allows you to Rip a music CD but the instructions are slightly different.