Tuesday, December 1, 2009

Tips for Printing a Web Page

When you print from the Internet you might be surprised at the results -- the page might be cut off on the right or too small to read. Web pages are NOT designed for printing. Some of the newer browsers automatically resolve this problem by shrinking the web page to fit on a standard 8 ½ x 11 page; however this can produce results where the print is very small and difficult to read.


Here are a few tips to improve your print results:

Look on the web page for a “printer-friendly” view and print from that view if it is available.

If a “Printer-friendly” view is NOT available and you are using Internet Explorer (version 7 or 8) to view the web, use the Print Preview option to make changes BEFORE you print. Print Preview allows you to see exactly how the web page(s) will look when printed and the number of pages that will print.

Click File from the menu bar and then click Print Preview. Use the navigation buttons at the bottom of the screen to scroll to view each page that will print.
If the text is difficult to read in Print Preview, change the direction of the paper to “Landscape” using ONE of these methods:
     -- Click the Landscape button on the toolbar

     -- Press ALT+L on the keyboard.

If the Print Preview is acceptable, click the Printer button on the toolbar to print the web page(s).




Sunday, November 1, 2009

Having trouble opening Microsoft Word email attachments?

Office 2007 attachments have a different file extension than previous versions of Microsoft Office. (The file extension is the 3 or 4 letters after the file name, for example if the file is called "Test" and it is an older Word document, it would appear as: Test.doc where "doc" is the file extension.) 
Every file extension is associated with a different program so your computer knows what program to use in opening the file.
If you receive an email attachment with an “x” or an “m” at the end of the extension, it is probably a Microsoft Office 2007 file.
Example:


2007 Excel files end with: .xlsx or .xlsm (contains macros)

2007 Word files end with: .docx or .docm (contains macros)

2007 PowerPoint files end with: .pptx or .ppsx


If you are using an earlier version of Microsoft Office (i.e. 2000, 2002, or 2003) you will NOT be able to view Microsoft Office 2007 files, unless your computer has the Compatibility Pack for 2007 Office System (2007 file conversion add-on) downloaded. If you need this 2007 add-on, it can be downloaded from Microsoft.


IMPORTANT: Be sure to install all High-Priority updates from Microsoft Update before downloading the Compatibility Pack.

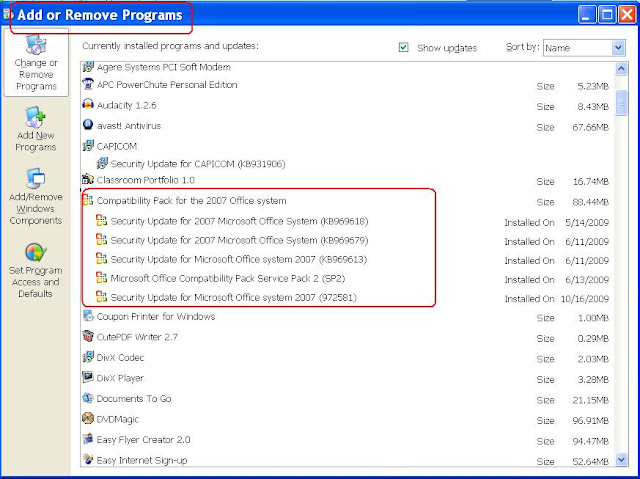
Computers that already have the Compatibility Pack for 2007 Office System will display it in the Add or Remove Programs under the Control Panel. (See screenshot below.)


To see if the Compatibility Pack is already installed on your computer, do the following:

Windows XP Users:


1. Click Start; Control Panel; Add or Remove Programs.


2. If you have Compatibility Pack for the 2007 Office System displayed in the list, you will be able to open Office 2007 files.


Thursday, October 1, 2009

Internet Explorer - Create a Shortcut to a Website

Do you have a website that you like to visit frequently?
Create a shortcut on your desktop to quickly access any website.
Here's how:
  1. Open Internet Explorer.

  2. View the website for which you want a shortcut.

  3. Click "File" from the menu bar and then select "Send" and "Shortcut to desktop".

  4. Now close Internet Explorer and you will see a shortcut to the website on your desktop.

  5. Double-click on the shortcut to open the website.


Here's an example of a shortcut to "CraigsList" :


Notes:

  • You must be connected to the Internet for the shortcut to open a website.

  • If the Menu Bar is not showing (version 8), right-click in a blank area of the toolbars and click "Menu Bar" from the list.

Tuesday, September 1, 2009

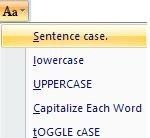
Don't Retype...Change Case (Microsoft Word)

Do you know that if you've typed a sentence, paragraph, or entire document in a specific case like ALL CAPS and later want to change it to lower case, Title Case (first letter of each word is capitalized) or Sentence case (first letter of sentence is capitalized), you can easily change the case without retyping!


Microsoft Word 2003 and earlier:


  1. Select the text you wish to change.

  2. From the menu bar click Format; Change Case.

  3. Select the case to use.

  4. Click OK.

Microsoft Word 2007:

  1. Select the text you wish to change.

  2. On the Home tab, in the Font group, click the Change Case button.

  3. Select the case to use.

Note: This option is also available in Microsoft Outlook if you are using Word as your email editor.

Saturday, August 1, 2009

Microsoft Excel - Easily Switch Between Multiple Worksheets


If you have an Excel workbook that contains many worksheets, you’ll find that switching between sheets can be tiresome. There is only so much room available for Excel to display the worksheet tabs, so you are often forced to scroll between the sheet’s tabs.

To quickly select a worksheet tab that is not within view:

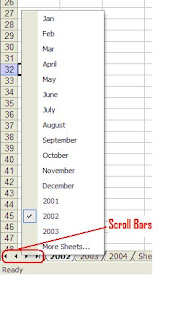
Right-click on the worksheet scroll bars. (See screen shot on left.)
Click on the appropriate worksheet.

Note: If there are too many worksheets to display, “More Sheets…” is listed at the bottom of the menu. To view all sheets, click “More Sheets:“ to bring up the “Activate” dialogue box. Then to activate the sheet you want, simply select it from the list and click OK.

Wednesday, July 1, 2009

Using History in Internet Explorer v7 or v8**

If you use Microsoft Internet Explorer browser to access the Internet, you can use the History tool to return to web pages that you have visited in the past 20 days. This is a helpful feature if you have forgotten the web address of a site you previously visited. (Note: The number of days that IE keeps in History can be changed. See “How to Change History”.)

How to Access History

1. Open Internet Explorer.

2. Click the star icon (IE v7) or click the Favorites icon (IE v8).


3. Click History. The History task pane displays.

4. Select the down arrow on the History task pane to change how you view history.

5. The following view options are available:

  • View by date

  • View by site

  • View by most visited

  • View by order visted today
6. Once you’ve chosen how you want to view History, click the page link to view a specific web page.

**If you don’t know what version of Internet Explorer you have installed, click Help, from the menu bar and then select “About Internet Explorer”. The window will open to display the version you are currently using.

How to Change History

If you want to delete the history or change the number of days that are stored in history, follow these steps:
  1. Open Internet Explorer.

  2. Click Tools and then select Internet Options from the menu bar.

  3. On the General tab, locate the History section and click either Delete (to make selections to delete your history) or click Settings to specify the number of days Internet Explorer should save the list of websites you have visited.

  4. After making your changes, click OK at the bottom of each window to save your changes.

Monday, June 1, 2009

Email Large Attachments in a Compressed Folder Using Windows 7, XP or Vista

If you have many photos or large files that you want to send to someone else via email, you may find that the attachments are too large for your ISP to send. If you are using Windows XP or Windows Vista, you can greatly reduce the size of the attachments by first creating a compressed (zipped) folder and then dragging the files you wish to send, into the compressed folder. (You can also send a Microsoft Access database using this method.) When files are inside a compressed folder, the files become compressed automatically. After you have all the files in the compressed folder, you can attach the folder following the same method you would attach a normal single file.

How to Create a Compressed Folder and Email Compressed Files or Photos


  1. Right-click on a blank area of the Desktop.

  2. Point to New, and then click Compressed (zipped) Folder.

  3. A new compressed (zipped) folder is displayed on your Desktop.

  4. Optional: while the name is highlighted, type a name for the compressed folder and press ENTER.

  5. Locate (do not open) the files or photos that you want to place in the folder.

  6. Click and drag the files or pictures to the compressed folder.

  7. Open your email and attach the compressed folder.

Friday, May 1, 2009

Reprinting the Same Address on Multiple Envelopes in Microsoft Word 2003

When you use the regular Envelope print option in Microsoft Word you are required to enter the address information in the provided window. Once you click the PRINT button, the window closes, so if you want to print additional envelopes with the same address, you are forced to reopen the same window and reenter the same address. Here’s a way that you can print the same address on multiple envelopes:

1. Open Microsoft Word 2003 and type the name and address on a blank sheet of paper.

2. Click the Tools menu, and then select Letters and Mailings and then Envelope & Labels.

3. The address you selected above appears in the Delivery Address section of the Envelopes and Labels window. (Click the Envelopes tab if the Labels tab is showing.)

4. Click the Options button to choose the correct envelope size and then click OK.

5. Place the envelopes in the printer.

6. Click Print.

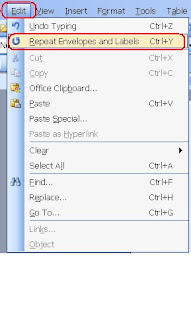
7. To print additional envelopes with the same address, click Edit on the menu bar and then click Repeat Envelopes and Labels. (Shortcut: Press Ctrl+Y on your keyboard).

8. Repeat the last step for every additional envelope you want to print.

Note: This option is not available in Word 2007.

Wednesday, April 1, 2009

Change how Microsoft Word 2003/2007 Attachments Open in Email

When opening a Microsoft Word 2003 or 2007 attachment from your email, Word is set to automatically open in a Reading Layout view (2003) or Full Screen Reading view (2007). This view makes reading a document more like reading a book, (looking at 2 pages, side by side) however, sometimes this view makes the document more difficult to read. If you don't want your Word attachments to automatically open in the Reading Layout view or Full Screen Reading view, you can turn off this option in either version by following the steps below specific for each version of Microsoft Word.


Microsoft Word 2003


  1. Open Microsoft Word 2003.


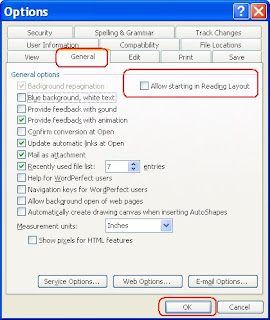
  2. From the Menu bar, select Tools and then click Options.


  3. Click the General tab on the Options dialog box.


  4. Deselect the box "Allow starting in Reading Layout".

  5. Click OK.

Microsoft Word 2007
  1. Open Microsoft Word 2007.

  2. Click the Office Button at the top left corner.

  3. Click the Word Options button at the bottom of the window.


  4. From the Word Options box, click Popular in the list on the left side of the window.


  5. Deselect the option: "Open e-mail attachments in Full Screen Reading view".


  6. Click OK.

Monday, March 2, 2009

PowerPoint Viewer 2007

Are you unable to open email attachments with a PowerPoint extension (.pps, .ppsx, .ppt or .pptx)?

You don’t have to have PowerPoint on your computer to view these files. You can view the files using the free PowerPoint Viewer 2007.


  • Overview
    PowerPoint Viewer 2007 lets you view full-featured presentations created in PowerPoint 97 and later versions. This viewer also supports opening password-protected Microsoft PowerPoint presentations. You can view and print presentations, but you cannot edit them in the PowerPoint Viewer 2007.

    To download the free viewer, click the link below or copy and paste it into your browser and then click the Download button and follow the prompts.

    http://www.microsoft.com/downloads/details.aspx?displaylang=en&FamilyID=048dc840-14e1-467d-8dca-19d2a8fd7485

    You can also use your search engine to search for PowerPoint Viewer 2007 download.

    Note: PowerPointViewer.exe takes approximately 14 minutes to download if you have DSL or cable. If you are using dial-up, it takes approximately 1 hour to download.

    System Requirements
  • Supported Operating Systems: Windows 2000 Service Pack 4; Windows Server 2003; Windows Vista; Windows XP
  • Random access memory (RAM):
    For Windows 2000 with Service Pack 4: 64 MB of RAM
    For Windows XP with Service Pack 1, Windows Server 2003: 128 MB of RAM
    For Windows Vista: 512 MB of RAM
  • 5 MB of available hard disk space
  • Super VGA (800 x 600) or higher screen resolution

Sunday, March 1, 2009

Sorting Favorites in Internet Explorer

Did you know that you can sort your “Favorites” in Internet Explorer? This option is hidden in the “Favorites” menu.


Click “Favorites” from the Menu bar.
Right-click on any item in the menu.
Click “Sort by Name”.


Your “Favorites” now appear in alphabetical order.